Tuesday, December 29, 2009

Coconut Joys

Here is a simple recipe for delicious coconut joys that can be used anytime of the year. We usually make an abundance of them for Christmas, but we have also been known to crank them out for other occasions and instead of the milk chocolate filling, we used colored candy melts to go with the theme.

Coconut Joys
1/2 cup butter
2 cups sifted powdered sugar
3 cups coconut
6 oz. milk chocolate chips, melted

Melt butter in saucepan. Remove from heat and add powdered sugar and coconut. Mix well. Shape rounded teaspoonfuls of mixture into balls, make a dent in the center with thumb and place on cookie sheet lined with waxed paper. Fill centers with melted chocolate. Chill until firm. Store in refrigerator.


Monday, December 28, 2009

Focaccia


Even with all the Christmas baking happening around here, I was in the mood to make some bread. I have become more experimental and comfortable working with yeast, so I thought I would give focaccia a try.
For years I have had a copy of Williams-Sonoma Essentials of Baking collecting dust on my shelf. My husband used a potato buttermilk roll recipe out of it a while back and had great success, so it was my turn!
The dough went together quickly and kneaded in the Kitchen for 6 minutes. After that, it was just a lot of waiting and making the topping. It was worth the wait. The bread turned out to be full of flavor and just the right texture. I think it would be delicious to use for BLT's, or as the book suggests, croutons for a Caesar salad.

Basic Focaccia
makes 1 large flatbread

2 pkgs. active dry yeast
1 3/4 c. warm water (105-110 degrees)
1 tsp. sugar
3/4 c. extra virgin olive oil
5 cups all purpose flour (plus extra for kneading)
2 tsp. fine sea salt
1 tsp. coarse sea salt

In the bowl of a stand mixer, dissolve the yeast in the warm water and let stand until foamy, about 5 minutes. Add the sugar, 1/2 c. of olive oil, the flour, and the the fine sea salt. Place the bowl on the mixer, attach the dough hook, and knead on low speed until the dough is smooth and elastic, 5-7 minutes. Add up to 1/2 c. flour while kneading to prevent the dough from sticking. Remove dough from the bowl.
Form the dough into a ball, transfer to a lightly oiled bowl, and cover the bowl with plastic wrap. Let the dough rise in a warm, draft-free spot until it doubles in bulk, 1-1 1/2 hours. For a more flavorful bread, make the dough up to this point, punch it down, cover the bowl with plastic wrap, and refrigerate overnight. Let the dough come to room temp before shaping.
Pour the remaining 1/4 c. of oil evenly in half-sheet pan. Turn the dough out into the pan. Press the dough evenly into the pan. If it is too elastic to spread without springing back, let it rest for five minutes. Cover the pan loosely with a dry kitchen towel. Let the dough rise in a warm, draft-free spot until it doubles in size, about 1 hour.
Position a rack in the lower third of the oven and preheat to 450 degrees. Dimple the dough by pressing your fingertips all the way into it at 1-inch intervals over the entire surface. Sprinkle it with the coarse salt, if desired.
Bake the focaccia until golden brown, 20-30 minutes. Transfer to wire rack and let cool in pan. Cut it into squares and serve warm or at room temperature. Store tightly wrapped in aluminum foil at room temp for up to 1 day or freeze for up to 2 weeks. Reheat at 375 degrees for 10 minutes.

Topping:
I caramelized a sweet onion in butter and sugar and then added some finely chopped rosemary and garlic and sauteed for a couple minutes. Spread the mixture over the dough before dimpling and sprinkle with salt.

*Note: I only kneaded for 6 minutes, and did not need to add additional flour to prevent dough from sticking. Also, next time I make this, I may move it up one rack as the bottom of the dough seemed to get a little done for my liking.

Saturday, December 26, 2009

Buckeyes


In the next few days I will be sharing some of the Christmas cookies my sister and I made earlier in the week. Today is the family favorite and people pleaser, Buckeyes. Maybe it is because we have had them every year for as long as I can remember, or maybe it is the wicked combination of chocolate and peanut butter, but whatever the reason, I highly recommend whipping up a batch of these and sharing them if you don't devour them yourself first!

Buckeyes
modified from Gifts from the Kitchen
(an old school Better Homes and Gardens book)


2 c. peanut butter
1/2 c. butter or margarine
4 1/2 c. sifted powdered sugar
3 c. Rice Krispies
2 c. chocolate chips

Melt peanut butter and butter. Mix sugar and cereal. Pour butter mix over sugar mix and blend with hands. Form into balls and chill until firm. Melt chocolate in double boiler; dip balls in chocolate and place on waxed paper lined baking sheet. Chill till firm.

Note: The last few batches I have made I reduced the powdered sugar by approximately 1/2-1 cup. This makes the mixture much easier to handle and roll. Also, if you don't have a Wilton chocolate melting pot, seriously consider saving your JoAnn coupon and investing! It makes the job so much easier.

Friday, December 25, 2009

Merry Christmas!


Just wishing you and yours a lovely Christmas! We baked and decorated these cookies yesterday and enjoyed them for Christmas Eve and again today. Thanks to Ashlee for the recipe and the good ol' internet for a modified royal icing. After all the iced sugar cookies I have cranked out in my day, these are by far the best tasting and now I have my go-to recipe for shiny royal icing that tastes delicious and won't break your teeth!

Thursday, December 24, 2009

Barefoot Bloggers Stuffed Mushrooms


This week we have Michelle of Welcome to the Club to thank for our Barefoot recipe. She very wisely chose a great appetizer that I am certain will be making an appearance on many a holiday table. Ina's Stuffed Mushrooms proved to be a simple recipe, but we had a difficult time finding the mascarpone here in the north country, but we made a substitute out of cream cheese, heavy cream, and butter. The next time we throw this together, we will certainly look for larger mushrooms to ensure that not a bit of the delicious filling goes to waste!

Stuffed Mushrooms
courtesy of Ina Garten

16 extra-large white mushrooms
5 tablespoons good olive oil, divided
2 1/2 tablespoons Marsala wine or medium sherry
3/4 pound sweet Italian sausage, removed from the casings
6 scallions, white and green parts, minced
2 garlic cloves minced
2/3 cup panko crumbs
5 ounces mascarpone cheese, preferably from Italy
1/3 cup freshly grated Parmesan
2 1/2 tablespoons minced fresh parsley leaves
Salt and freshly ground black pepper

Preheat the oven to 325 degrees F.

Remove the stems from the mushrooms and chop them finely. Set aside. Place the mushroom caps in a shallow bowl and toss with 3 tablespoons of the olive oil and Marsala. Set aside.

Heat the remaining 2 tablespoons olive oil in a medium skillet over medium heat. Add the sausage, crumbling it with the back of a wooden spoon. Cook the sausage for 8 to 10 minutes, stirring frequently, until it's completely browned. Add the chopped mushroom stems and cook for 3 more minutes. Stir in the scallions and garlic and cook for another 2 to 3 minutes, stirring occasionally. Add the panko crumbs, stirring to combine evenly with all the other ingredients. Finally, swirl in the mascarpone and continue cooking until the mascarpone has melted and made the sausage mixture creamy. Off the heat, stir in the Parmesan, parsley, and season with salt and pepper, to taste, Cool slightly.

Fill each mushroom generously with the sausage mixture. Arrange the mushrooms in a baking dish large enough to hold all the mushrooms in a snug single layer. Bake until the stuffing for 50 minutes, until the stuffing is browned and crusty.


Friday, November 27, 2009

Mr. Whiskers Bread


When I was teaching Kindergarten, I couldn't imagine a late November passing me by without reading Cranberry Thanksgiving to my students. If you have never had the chance to enjoy the Cranberry series by Wende and Harry Devlin, you should really check it out and share it with any little ones in your life. Not only do the stories have a nice lesson, there is always some type of cranberry recipe in the back that happens to be really delicious. The one I will share today is a slight adaptation to the one in Cranberry Thanksgiving and is a nice addition to a brunch or dinner any time of the year. The dough goes together quickly and is a great use for those fresh cranberries hanging around the local stores. The bread fills the house with an amazing scent and freezes well, so you can plan ahead for all of your holiday gatherings.

Mr. Whiskers Cranberry Bread

2 c. flour
1 c. sugar
1 1/2 tsp. baking powder
1/2 tsp. baking soda
1/2 tsp. salt
2 tsp. orange zest
3/4 c. orange juice
2 T. oil
1 egg
1 c. chopped cranberries (use the Cuisinart...you'll thank me later)

Preheat oven to 350. Stir together dry ingredients. Add the orange juice and oil and mix until combined. Add the egg and beat until combined. Stir in cranberries and pour batter into well greased loaf pan. Bake for 1 hour or until toothpick comes out clean.


Thursday, November 26, 2009

Barefoot Bloggers Pot Roast

Ina's Company Pot Roast

Ingredients

1 (4 to 5-pound) prime boneless beef chuck roast, tied

  • Kosher salt and freshly ground black pepper
  • All-purpose flour
  • Good olive oil
  • 2 cups chopped carrots (4 carrots)
  • 2 cups chopped yellow onions (2 onions)
  • 2 cups chopped celery (4 stalks)
  • 2 cups chopped leeks, white and light green parts (2 to 4 leeks)
  • 5 large garlic cloves, peeled and crushed
  • 2 cups good red wine, such as Burgundy
  • 2 tablespoons Cognac or brandy
  • 1 (28-ounce) can whole plum tomatoes in puree
  • 1 cup chicken stock, preferably homemade
  • 1 chicken bouillon cube
  • 3 branches fresh thyme
  • 2 branches fresh rosemary
  • 1 tablespoon unsalted butter, at room temperature

Preheat the oven to 325 degrees F.

Pat the beef dry with a paper towel. Season the roast all over with 1 tablespoon salt and 1 1/2 teaspoons pepper. Dredge the whole roast in flour, including the ends. In a large Dutch oven, heat 2 tablespoons olive oil over medium heat. Add the roast and sear for 4 to 5 minutes, until nicely browned. Turn and sear the other side and then turn and sear the ends. This should take 4 to 5 minutes for each side. Remove the roast to a large plate.

Add 2 tablespoons olive oil to the Dutch oven. Add the carrots, onions, celery, leeks, garlic, 1 tablespoon salt, and 1 1/2 teaspoons pepper and cook over medium heat for 10 to 15 minutes, stirring occasionally, until tender but not browned. Add the wine and Cognac and bring to a boil. Add the tomatoes, chicken stock, bouillon cube, 2 teaspoons salt, and 1 teaspoon pepper. Tie the thyme and rosemary together with kitchen string and add to the pot. Put the roast back into the pot, bring to a boil, and cover. Place in the oven for 2 1/2 hours, until the meat is fork tender or about 160 degrees F internally. Turn the heat down to 250 degrees F after about an hour to keep the sauce at a simmer.

Remove the roast to a cutting board. Remove the herb bundle and discard. Skim off as much fat as possible from the sauce. Transfer half the sauce and vegetables to a blender or a food processor fitted with the steel blade and puree until smooth. Pour the puree back into the pot, place on the stovetop over low heat, and return the sauce to a simmer. Place 2 tablespoons flour and the butter in a small bowl and mash them together with a fork. Stir into the sauce and simmer for 2 minutes, stirring until thickened. Taste for seasonings. Remove the strings from the roast, and slice the meat. Serve warm with the sauce spooned over it.

**This was a delicious dish! We had it last weekend, since we would obviously be having turkey for dinner today. We especially loved the sauce, as it seemed the meat was a little on the fatty side. Not sure if it is normal for the cut or just an issue for the piece we bought.


Sunday, November 22, 2009

Pumpkin Chocolate Chip Cookies


You can never go wrong when you combine pumpkin and chocolate. It is a really delicious combination, particularly when the chill of Fall sets in. This recipe was shared with me from a close friend of my husband's family. Phylis is a baking machine, constantly turning out amazing bread, cookies, and pies that are out of this world. Here is a cookie recipe that will not disappoint.

Phyl's Pumpkin Chocolate Chip Cookies

Ingredients
1 cup shortening
1 stick unsalted butter
1 cup brown sugar
1 cup white sugar
3 eggs
1 1/2 cups pumpkin
4 cups flour
1 tsp. salt
2 1/2 tsp. baking powder
2 tsp. baking soda
2 tsp. cinnamon
1/4 tsp. nutmeg
1 package good chocolate chips

Directions
Cream first four ingredients. Add in eggs one at a time until combined. Stir in pumpkin. Sift together dry ingredients and add slowly to wet mixture. Once the dough has come together, stir in package of chocolate chips. Chill before baking. Preheat oven to 375 degrees. Bake for 10 minutes.
**These also freeze well.

Thursday, November 12, 2009

Barefoot Bloggers Creme Brulee


This weeks Barefoot Blogger post comes to us courtesy of Suzie from Munch and Nibble. I have tasted many a creme brulee in my day, but this was the first time I tackled it myself. I must say the recipe was incredibly easy to follow and yielded great results. In fact, I have never had crust as tasty as it was homemade. We are in the middle of a move, so the kitchen torch is God knows where so the broiler was a great stand in. I left the oven door open and watched carefully to develop that delicious crackle that is my favorite component of creme brulee. Thanks for another winner, Ina!

Creme Brulee

  • 1 extra-large egg
  • 4 extra-large egg yolks
  • 1/2 cup sugar, plus 1 tablespoon for each serving
  • 3 cups heavy cream
  • 1 teaspoon pure vanilla extract
  • 1 tablespoon orange liqueur (recommended: Grand Marnier)

Directions

Preheat the oven to 300 degrees F.

In the bowl of an electric mixer fitted with the paddle attachment, mix the egg, egg yolks, and 1/2 cup of the sugar together on low speed until just combined. Meanwhile, scald the cream in a small saucepan until it's very hot to the touch but not boiled. With the mixer on low speed, slowly add the cream to the eggs. Add the vanilla and orange liqueur and pour into 6 to 8-ounce ramekins until almost full.

Place the ramekins in a baking pan and carefully pour boiling water into the pan to come halfway up the sides of the ramekins. Bake for 35 to 40 minutes, until the custards are set when gently shaken. Remove the custards from the water bath, cool to room temperature, and refrigerate until firm.

To serve, spread 1 tablespoon of sugar evenly on the top of each ramekin and heat with a kitchen blowtorch until the sugar carmelizes evenly. Allow to sit at room temperature for a minute until the caramelized sugar hardens.


Thursday, October 22, 2009

Barefoot Bloggers Blue Cheese Souffle

This weeks selection comes to us from Summer of Sexy Apartment. I have never taken myself to task to make a souffle, but I must say that I am so happy to have that culinary milestone under my belt!
I think this dish would be the star for your next luncheon with the ladies, or a light supper paired with a salad of mixed greens and some fresh fruit. It went together quickly and despite my stressing about how it would actually turn out, I was pleasantly surprised.
The blue cheese flavor wasn't overwhelming, but simply provided some tanginess to compliment the eggs. I will definitely be making this one again!


Tuesday, October 6, 2009

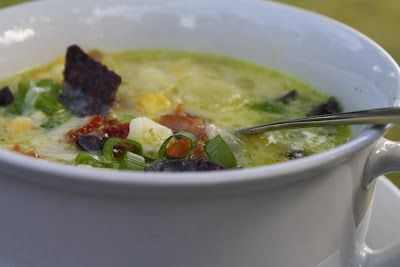
Barefoot Bloggers Corn Chowder


This week we have Jill of My Next Life to thank for choosing such a delicious Fall soup. I am not a chowder connoisseur, mostly because I can't stand the thought of clams coming anywhere near me, but this selection was a really winner sans seafood.
There was a fair amount of prep work involved, but when you have a willing husband, you can make quick work of that dilemma!
We absolutely loved this dish. There was a complexity of flavors with the addition of the turmeric, and it really added to the overall taste of the chowder. The only additions we made were the green onions and blue corn chips for garnish. I think this would be fantastic with some homemade croutons, but alas, there was no time to include them.
Cheddar Corn Chowder
Ina Garten

8 ounces bacon, chopped
1/4 cup good olive oil
6 cups chopped yellow onions (4 large onions)
4 tablespoons (1/2 stick) unsalted butter
1/2 cup flour
2 teaspoons kosher salt
1 teaspoon freshly ground black pepper
1/2 teaspoon ground turmeric
12 cups chicken stock
6 cups medium-diced white boiling potatoes, unpeeled (2 pounds)
10 cups corn kernels, fresh (10 ears) or frozen (3 pounds)
2 cups half-and-half
8 ounces sharp white cheddar cheese, grated
Directions
In a large stockpot over medium-high heat, cook the bacon and olive oil until the bacon is crisp, about 5 minutes. Remove the bacon with a slotted spoon and reserve. Reduce the heat to medium, add the onions and butter to the fat, and cook for 10 minutes, until the onions are translucent.
Stir in the flour, salt, pepper, and turmeric and cook for 3 minutes. Add the chicken stock and potatoes, bring to a boil, and simmer uncovered for 15 minutes, until the potatoes are tender. If using fresh corn, cut the kernels off the cob and blanch them for 3 minutes in boiling salted water. Drain. (If using frozen corn you can skip this step.) Add the corn to the soup, then add the half-and-half and cheddar. Cook for 5 more minutes, until the cheese is melted. Season, to taste, with salt and pepper. Serve hot with a garnish of bacon.


Thursday, September 10, 2009

I'll Have My Cake


What a busy week! I started a new job and by the design on Ina's cake, you may guess that it is teaching 5th Grade. In the midst of all the craziness, my lovely mother offered to make the cake since this is only the third day of school. What on earth would we do without our mothers, even when we are old enough to fend for ourselves?! The only issue she had in the process was that the pan she had on hand was smaller than the one Ina called for in the recipe. You can find the recipe at the Food Network website, or on page 216 in Family Style. I apologize for not going into further detail or providing more links, but this dial-up business is for the birds!

Saturday, September 5, 2009

Barefoot Bloggers Pizza

Please check out this link to see the pizzas we made awhile back. Tara was kind enough to allow us to re-post since we had already made the recipe. Please know that these pizzas are fan-tastic and we have indeed made them several times since. They will NOT dissapoint!

Thursday, August 13, 2009

Barefoot Bloggers Mango Banana Daiquiris


Since I am away from my computer this post will be shorter than normal. You see, I am dealing with the curse of dial-up for the time being.
This week's selection was perfect for a warm summer evening, but I have to say that I went very easy on the rum. The dust-covered bottle only had 1/2 of the amount called for in the original recipe, so I went with it. If I had been paying closer attention, I also would have made less of the simple syrup as it only called for 1/2 cup.
In the end, I would make this again for the smooth texture and slight kick of rum. This would be a fun recipe to share with friends at your next girls night.

Mango Banana Daiquiris
makes 4 drinks
Barefoot Contessa Back to Basics

2 c. chopped ripe mango (1-2 mangoes, peeled and seeded)
1 ripe banana, chopped
1/2 c. freshly squeezed lime juice (4 limes)
1/4 sugar syrup (*see note)
1 1/4 c. dark rum
mango slices for serving

Place the mango, banana, lime juice, sugar syrup, and rum in a blender and process till smooth. Add 2 cups of ice and process until smooth and thick. Serve ice cold in highball glasses with mango slices.
*Note: to make the sugar syrup heat 1 cup sugar and 1 cup water until the sugar dissolves. Chill.

Friday, July 31, 2009

Lemony Potato Salad

Whenever I see a recipe for potato salad I start scheming to figure out when I can throw it together and who is going to eat it with me. Although the dog-eared July issue of Gourmet magazine has provided a myriad of delicious recipes, it wasn't until this past weekend that I finally made the Lemony Potato Salad.
I have to admit the addition of lemon zest and juice may have scared me off at first. Let me assure you, though, it is a fantastic combination! It gives the salad a lighter feel and with only a 1/2 cup of mayo to three pounds of potatoes, you can feel a little better about shoveling it in spoonful after spoonful. The original recipe suggests bringing the salad to room temp before serving, but I for one will not take a chance when serving mayonnaise in the summer heat.

Lemony Potato Salad
adapted from Gourmet Magazine

3 lb. small boiling potatoes (we used Yukon Golds)
1 cup chopped celery
1/2 c. mayonnaise
1/4 cup finely chopped green onions
1 tsp. lemon zest
2 T. fresh lemon juice
1 tsp. sugar
1 T. kosher salt
1 tsp. fresh ground pepper

Cover potatoes with water in large pot and season well with salt. Bring to boil, then simmer until tender, 12 to 20 minutes. While potatoes cook, stir together celery, mayonnaise, green onions, lemon zest and juice, sugar, salt, and pepper in a large bowl. Drain potatoes and cool completely, then halve or quarter. Add to dressing and toss to coat.


Thursday, July 30, 2009

Rolo Cookies


My mother has amassed quite a collection of cookbooks over the years and she always is able to weed through the pages to find delicious and special recipes to share with family and friends. She was given a Best of Friends cookbook by a family member and immediately found a cookie recipe we would enjoy for years to come.
I happened to make these a few weeks back when a craving for chocolate and caramel was to overwhelming to ignore. I do want to mention the dough tends to be quite loose, so refrigerating it for a period will make the process a little easier. These are time consuming, but a very special treat to share, or if you are anything like me, polish off on your own while watching trashy Bravo network programming!

Rolo Cookies
c/o Best of Friends, Etc.
by: Darlene Glantz Skees


2 1/2 cups flour
3/4 cup unsweetened cocoa
1 tsp. baking soda
1 cup sugar
1 cup brown sugar (packed)
1 cup butter (room temperature)
2 tsp. vanilla
2 eggs
1 cup chopped pecans
48 Rolos (9 oz. pkg.)
2 Tbsp. sugar
4 oz. vanilla candy coating or white chocolate

Beat together 1 cup granulated sugar,1 cup packed brown sugar, and 1 cup butter until light and fluffy. Add vanilla and eggs and beat well. Add flour, cocoa and soda and blend well. Stir in 1/2 cup chopped pecans if desired. Shape 1 tbsp. dough around a Rolo. Combine 1/2 cup chopped pecans and 2 Tbsp. sugar and press one side of each ball into pecan mixture. Place nut side up, 2" apart on cookie sheet. Bake at 375 degrees for 7-8 minutes. Cool 2 minutes, remove from sheet and drizzle with melted white chocolate.


Thursday, July 23, 2009

Barefoot Bloggers Peach Blueberry Crumble


This week's Barefoot challenge is the Peach Blueberry Crumble from Barefoot Contessa at Home. I definitely send my thanks to Aggie of Aggie's Kitchen for this delicious selection. We really enjoyed the addition of the lemon juice and zest in this recipe. It's presence certainly brightened the flavor of the other fruits and gave it such a summery flavor. My only issue with this recipe is that there is not a local peach to be found in our part of Michigan at this time in the summer. We were able to use local blueberries, but the peaches from the grocery store just weren't ripe enough to make this sing. Here is my proposal: try again at the very end of August/beginning of September when we can easily source local blackberries and peaches simultaneously. Problem solved!!

Peach and Blueberry Crumbles
Recipe by Ina Garten, Barefoot Contessa at Home

For the fruit
  • 2 lbs firm, ripe peaches (6-8 peaches)
  • 2 tsp grated lemon zest
  • 2 tbsp freshly squeezed lemon juice
  • 1/2 cup granulated sugar
  • 1/4 cup all-purpose flour
  • 1 cup fresh blueberries (1/2 pint)

For the Crumble

  • 1 cup all-purpose flour
  • 1/2 cup granulated sugar
  • 1/4 cup light brown sugar, lightly packed
  • 1/2 tsp kosher salt
  • 1/4 tsp ground cinnamon
  • 1/4 lb (1 stick) cold unsalted butter, diced
Preheat the oven to 350 degrees.

Immerse the peaches in boiling water for 30 seconds to 1 minute, until their skins peel off easily. Place them immediately in cold water. Peel the peaches, slice them into thick wedges, and place them in a large bowl. Add the lemon zest, lemon juice, granulated sugar, and flour. Toss well. Gently mix in the blueberries. Allow the mixture to sit for 5 minutes. Spoon the mixture into ramekins or custard cups.

For the topping, combine the flour, granulated sugar, brown sugar, salt, cinnamon, and the butter in the bowl of an electric mixer fitted with a paddle attachment. Mix on low speed until the butter is the size of peas. Rub the mixture with your fingertips until it’s in big crumbles, then sprinkle evenly over the fruit. Place the ramekins on a sheet pan lined with parchment paper and back for 40 to 45 minutes, until the tops are browned and crisp and the juices are bubbly. Serve warm or at room temperature. If you want to make these early, store the unbaked crumbles int he refrigerator and bake before dinner. Serves 5 to 6.


Thursday, July 9, 2009

Barefoot Bloggers Pasta with Sudried Tomatoes


This weeks selection for the Barefoot Bl0ggers came from Cat over at Delta Whiskey. We took this dish over to our friends Timm and Faith, and one of the comments that came from that noshing was, "This is Summer!" Our sentiments exactly. A couple of modifications we made: We could not find sundried tomatoes at the local grocery store so we substituted a jar of sundried tomato bruschetta and we found it worked like a charm. After perusing the reviews at the Food Network we decided to cut back on the oil, double the pasta, and due to our personal tastes we nixed the kalamata olives and the capers. Verdict: we will be making this again during the height of the tomato harvest. The tartness of the vinegar, the acidity of the tomato, and the creaminess of the fresh mozzarella was an unbelievable combination of tastes and textures. A big thank you goes out to Cat for choosing this simple, fresh summer dish.

Pasta with Sundried Tomatoes
courtesy of Ina Garten via the Food Network

1/2 pound fusilli (spirals) pasta
Kosher salt
Olive oil
1 pound ripe tomatoes, medium-diced
3/4 cup good black olives, such as kalamata, pitted and diced
1 pound fresh mozzarella, medium-diced
6 sun-dried tomatoes in oil, drained and chopped

For the dressing:

5 sun-dried tomatoes in oil, drained

2 tablespoons red wine vinegar

6 tablespoons good olive oil

1 garlic clove, diced

1 teaspoon capers, drained

2 teaspoons kosher salt

3/4 teaspoon freshly ground black pepper

1 cup freshly grated Parmesan

1 cup packed basil leaves, julienned

Cook the pasta in a large pot of boiling salted water with a splash of oil to keep it from sticking together. Boil for 12 minutes, or according to the directions on the package. Drain well and allow to cool. Place the pasta in a bowl and add the tomatoes, olives, mozzarella, and chopped sun-dried tomatoes.

For the dressing, combine the sun-dried tomatoes, vinegar, olive oil, garlic, capers, salt, and pepper in a food processor until almost smooth.

Pour the dressing over the pasta, sprinkle with the Parmesan and basil, and toss well.

Sunday, July 5, 2009

Burgers and Buns


I am always mesmerized with the beautiful food and photos over at the Smitten Kitchen, and when I saw the light brioche burger buns the other day, I knew I had to give them a go. The recipe was easy and really made the burger more special. I previously mentioned how tasty goat cheese and caramelized onions are on a burger, and today was no exception. We also threw on some mixed greens straight from the garden and a nice slice of tomato to top it off. Although it is so easy and convenient to simply pick up a package of buns at your local grocery store, I really think for the little bit of hands on time, it is beyond worth it to make your own. Needless to say, these are definitely part of the repertoire from here on out!


Thursday, July 2, 2009

Strawberry Shortcake Cake


Since we knew time would be limited on the Fourth, we thought we would get together with our good friends Timm and Faith and celebrate early. We went for simple, picnic style food and came up with the following menu:
Burgers with all the fixins'
Corn Salad
Potato Salad
Strawberry Shortcake Cake
The Strawberry Shortcake Cake came straight from my favorite down-home gal The Pioneer Woman, and like all the other recipes I have tried from her collection, was delicious. It was beyond moist and the cream cheese frosting complimented the berries beautifully. I will certainly make this again to share with family and friends.
And P.S....if you haven't tried goat cheese and caramelized onions on your burger, you are really missing out!

Thursday, June 25, 2009

Barefoot Bloggers Gazpacho


This week for our Barefoot Bloggers challenge, Gazpacho was the choice made by Meryl of My Bit of Earth. I was really excited about this one because I have always loved Gazpacho, and because it was too stinking hot to be doing much more than chopping! I really liked how it turned out...the texture, the depth of flavors, the sour cream I added to top it off. Matt on the other hand could not get on board with this one. It is rare that he doesn't like something, but the cucumbers were too much for him to stomach. I would make this again, but in retrospect I would halve the batch because it really does make a large portion.

Sunday, June 21, 2009

Not Just Tigers and Kid Rock


Today I want to give some props to the Motor City for churning out some really tasty potato chips. I was thumbing through my July issue of Country Living magazine when the spread Potato Chip Nation caught my eye. The magazine chose 31 favorites, and Better Made Special Potato Chips made the cut. We try to do our part by purchasing locally grown and produced products, so naturally I was happy that my snack habit is supporting Michigan's economy. Better Made has been a Detroit business for over 70 years. They source the majority of their potatoes from Michigan and really have an outstanding chip at a very reasonable price. I can't get enough of the Salt and Vinegar, but the Sour Cream & Onion comes in a close second. Better Made doesn't stop at chips, however, as they stock everything from pretzels to beef jerky. So, if you live in Michigan do your part and buy some Better Made Potato Chips for your next backyard BBQ, and if you don't, check out the article in Country Living and buy local!

Saturday, June 20, 2009

Veggie Bagel


Now that we are finally having consistently warmer days, we are starting to see local vegetables making an appearance at our farmer's market. Today we hit the jackpot with tomatoes, red pepper, and pickling cucumbers. Since it was sweltering today, I thought it was the perfect time to use those vegetables for my version of The Pioneer Woman's Veggie and Cheese Bagel.

Veggie and Cheese Bagel
adapted from The Pioneer Woman
*please note that I am not listing amounts, just the ingredients we used to assemble the bagels

Thomas' Everything Bagels
muenster cheese
pepperjack cheese
red onion
tomato
mesclun mix (from the raised garden bed of your's truly♥)
cucumber
dill pickle
sprouts
Philidelphia Garden Vegetable Cream Cheese Spread

Of course Matt had to add ham and salami to his "veggie" sandwich, but I went for straight up vegetables. Suspiciously, Matt brought home the Thomas' bagels without being asked to, so it makes me wonder if he has been spending sleepless nights scouring The Pioneer Woman's site. You be the judge. Also, if you haven't tried Garden Vegetable cream cheese, you're really missing out. It is perfect on bagels, crackers, and even as a dip for vegetables.

Tuesday, June 16, 2009

Corn Salad


I was looking for a light salad to play a supporting role to our protein last night and decided on Ina's version of corn salad. After the couscous debacle I had to right a wrong and this dish pulled through for a big win. Although we obviously don't have local corn yet, there happened to be a five-pack on sale this week and I had all the other ingredients on hand. It was just meant to be! The acidity of the vinegar paired well with the sweetness of the corn, and let me just say...basil and sweet corn are a match made in heaven.

Fresh Corn Salad
Ina Garten via Food Network

5 ears of corn, shucked
1/2 c. small diced red onion
3 T. cider vinegar
3 T. good olive oil
1/2 tsp. kosher salt
1/2 tsp. freshly ground black pepper
1/2 c. julienned fresh basil leaves

In a large pot of boiling salted water, cook the corn for 3 minutes until the starchiness is just gone. Drain and immerse it in ice water to stop the cooking and to set the color. When the corn is cool, cut the kernels off the cob, cutting close to the cob.

Toss the kernels in a large bowl with the red onions, vinegar, olive oil, salt, and pepper. Just before serving, toss in the fresh basil. Taste for seasonings and serve cold or at room temperature.


Monday, June 15, 2009

Raspberry Cream Tart


Yes, I know I should be making something with fresh Michigan strawberries, but this tart was calling my name. Since my sister mentioned that she had good luck with it over Memorial Day, I thought I better give it a go. The tart was featured in the May/June issue of Midwest Living magazine and it couldn't have been easier. I felt like I was cheating using a pre-made sugar cookie crust, but the flavor was delicious and it went together in a snap.

Raspberry Cream Tart
Midwest Living
1 16.5 ounce roll refrigerated sugar cookie dough, cut into 1/2 inch thick slices
2 3-ounce packages cream cheese, softened
1/4 c. granulated sugar
1 egg
1 tsp. finely shredded lemon peel
1 T. lemon juice
1/2 tsp. vanilla
2 c. fresh red raspberries, blueberries and/or blackberries
powdered sugar
Fresh red raspberries, blueberries and/or blackberries (optional)

1. Press cookie dough slices into bottom and fluted sides of a greased 11-inch tart pan with removable bottom. Do not prick. (Or, press onto bottom of greased 12-inch pizza pan.) Bake in a 350° oven 20 minutes or until light brown. Remove from oven; set aside.
2. In a small mixing bowl, beat cream cheese with an electric mixer on medium to high speed for 30 seconds. Add 1/4 c. sugar, egg, lemon peel, lemon juice and vanilla. Beat until combined. Pour cheese mixture over warm crust and spread evenly.
3. Place the two cups raspberries in a single layer on top of cheese mixture. Sprinkle raspberries with 2 tsp. sugar. Bake for 15-17 minutes more or until cheese mixture is set. Transfer to a wire rack; let cool for 30 minutes before serving.
4. Just before serving, sprinkle with powdered sugar. Garnish with additional fresh berries if you like. Makes 8 servings.

**A couple notes: I used a 9-inch tart pan since I am too cheap to buy the right size. I simply cut back on the sugar cookie dough, but I did add the same amount of filling. Because of this change, I only needed one small package of raspberries. We let the tart cool for the recommended 30 minutes, and it was very good, BUT, I think it would be even better if it chilled in the refrigerator prior to serving. I just think there is something seductively delicious about cold and tart lemon desserts! I also added more lemon juice, because that is just how I roll.

Thursday, June 11, 2009

Barefoot Bloggers Curried Couscous


This edition of Barefoot Bloggers comes to us courtesy of Ellyn over at Recipe Collector and Tester. She chose Ina's Curried Couscous and has used the recipe as is for several years. I was excited to try something that I would not choose on my own, which is really one of the reasons I joined the group to begin with.
The dish was extremely easy and fast to prepare and had a great texture. After browsing the reviews on the Food Network website, I decided I would only add a little of the dressing at a time. I was glad I did. Matt loved the dish, but I just thought it was okay. Don't get me wrong, I really did enjoy the combination of the ingredients in the couscous mixture, but maybe I am just not a curry fan. I will certainly give it another chance, but I may make a different dressing for this particular salad.

It's 5 o'clock Somewhere!


Yesterday was the last day of school where I have volunteered in the Kindergarten class. Quite a while back I stumbled upon Kelsey's blog Apple A Day and saw the cutest idea for happy hour cupcakes that she brought to school the first week. I figured the end of the year would be a great time to share these with the teachers who have worked hard and are ready for a little happy hour themselves! I adapted Kelsey's idea for a sign to put by the cupcakes: Sometimes Summer Vacation is too long to wait for Happy Hour, so have your Margarita/Pina Colada now! These were a big hit at school, and I would make again in a heartbeat. I knew I didn't want to put alcohol in the cupcakes since they were headed to a drug-free school zone (what a drag, right?), so here are the recipes I used.
Margarita Cupcakes
1 Duncan Hines Classic White cake mix
1 c. margarita mix ( I used non-alcoholic)
1/3 c. water
3 egg whites
2 T. vegetable oil
1 T. lime zest

Blend all ingredients on low speed until moistened. Beat at medium speed for 2 minutes. Pour batter in muffin cups and bake immediately. Bake at 350° for 18-21 minutes. *My oven is a real beast, so I only baked mine for 15 minutes.

Lime Buttercream
c/o Hostess With the Mostess
8 Tbsp butter, softened
8 oz cream cheese, softened
2 Tbsp lime juice (approx 2 fresh limes)
1 Tbsp margarita mix
1 tsp lime zest
5 cups powdered (confectioners’) sugar
cane sugar & fresh limes (for garnish)

In a large bowl, combine butter, cream cheese, lime juice, margarita mix, and lime zest. Beat with an electric mixer until light and fluffy. Add powdered sugar, one cup at a time, and continue beating until smooth. If icing is too thin, add more powdered sugar, a couple tablespoons at a time. Spread icing generously on each cooled cupcake* or use a pastry bag to frost. Sprinkle cane sugar around the edges of the cupcake for a “salt rimmed” look and garnish with lime wheels & wedges.

*Make sure to remove cupcakes from pan and cool completely before frosting.I was nervous about using fresh limes to garnish because of the moisture, so I picked up some mini gummi fruit slices and used Wilton White Sparkling Sugar for the salt rim.

Pina Colada Cupcakes

1 Duncan Hines Classic Yellow cake mix

1 c. Pina Colada mix (I used non-alcoholic)

1/3 c. water

1/3 c. oil

3 eggs


Blend all ingredients on low speed until moistened. Beat at medium speed for 2 minutes. Pour batter in muffin cups and bake immediately. Bake at 350° for 18-21 minutes.

Pina Colada Buttercream

1 stick butter, softened
8 oz. cream cheese, softened
3 T. pina colada mix
5 c. powdered sugar

Beat butter, cream cheese, and pina colada mix until fluffy. Add powdered sugar, a little at a time until the mixture is smooth.
**I used umbrella straws from Pier 1 as a garnish. I have had these for a couple years, so I don't know if they still carry them.